

But in this quiet time after Easter, it doesn’t seem so overwhelming. Especially when – to my little boys’ delight – the theme is not feminine swirls of icing on a pretty little house, but TOOLS!
I found a website describing the general process for designing a house, using posterboard as a template. If your template can be lightly taped together and stay standing, the author suggested, it’s a good bet your gingerbread structure will hold up, too.
Armed with that encouragement, I grabbed a piece of old posterboard from behind a cabinet – helpfully imprinted with ½” grid – and set to work on a simple divided box design.

“Boys,“ said I, “We’re gonna make us some gingerbread!” :)
There are many steps involved in making a gingerbread structure, and, given that I would be doing this with my children, I found it was easier to spread the activity out over several days:
- one for designing and testing the template
- one for mixing up the dough and baking (I was really surprised to discover how long the slabs needed to be baked!)
- and one for assembly and decorating.
Even if I were doing this entirely by myself, I can imagine getting pretty tired of the whole thing long before it was done, were I to go for an all-day marathon session. We started this on Monday, and finished today (Wednesday). Your temperament (and attention span) may vary.
Step One: Design
I just drafted a decent-sized box and set of tools, and went with it. If I had to do it over again, I would’ve cut my poster board first into pieces that fit onto my 14x18” and 9x12” cookie sheets, and scaled my pieces more efficiently from there. There really isn’t any reason for the size I went with (12”l, 8”w, 4”h), except that I think I had a large cereal box in mind as I drew, and those numbers work well with a ruler and a grid. The finished piece is pretty much “life-sized.”
For the tools, I used a bit of clipart found in my Excel program for inspiration, and eyeballed them to scale for the box. The saw, at 5x15”, is the largest.

We laid the template pieces flat out on the table, bottom edges touching, and “basted” them with a couple small strips of tape. Next, I set the handle insert in the middle, and lightly taped it to the bottom. Finally, I lifted the sides up into their box shape, taped the upper corners and secured the handle piece to the sides. I set the tool templates into the box to see if I liked the overall scale before continuing, too.
Of course, you can make any structure, with any theme, so long as your basic shape holds when you tape your template together! Box-based shapes are, of course, the easiest to work with.
Step Two: Dough Slabs
This recipe (which follows) makes 9 cups of dough, which is enough for two and a half 12x16” slabs of unbaked dough, ¼” thick (just enough to make the tool box and tools proportioned as I have here). For planning purposes, you may be interested to know that it uses most of a 12 oz jar of molasses, at least a pound of brown sugar, nearly half of a 5 lb bag of flour, and 3/4 of a pint of heavy cream.
With this recipe, you par-bake the dough for 30 minutes at 275 degrees F, then remove it from the oven to trace out and separate the pieces with a sharp knife (a pizza cutter is handy for the long, straight box lines). The dough is then baked for an additional 75 minutes (total baking time: 1 hr, 45 minutes).
Here is the Recipe (by Peggy Trowbridge Filippone for About.com):
- 1-1/2 c whipping cream
- 1 t vanilla
- 2-1/2 c firmly-packed brown sugar
- 2 T baking soda
- 1 T ground ginger
- 2 t cinnamon
- 1-1/3 c molasses
- 9 c all-purpose flour
Line 12x15” rimless baking sheets with parchment, and preheat oven to 275 degrees F.
Whip cream and vanilla together until soft peaks form; set aside.
In a separate bowl, mix brown sugar, baking soda, ginger & cinnamon. Add to the whipped cream, along with molasses, until well-combined.
With the mixer running on low speed, gradually add the flour, beating until completely mixed. (This turned out to be a little too much for my little beaters, and I stirred in the last cup or so of flour by hand.)
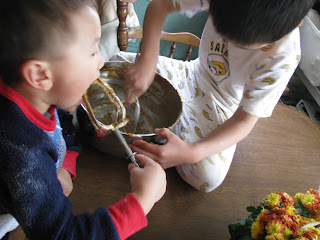
Of course, I had helpers.
I then rolled out the dough directly on the parchment-lined pan, after first giving the parchment a good sprinkling of flour. Place a little less than half of the dough on the parchment and flatten slightly; sprinkle with a little flour and cover with a sheet of plastic wrap to make it easier for the kids to succeed in rolling (I love doing this for myself, too). Because most of my pieces were rectangles, I added dough as necessary to fill the pan as we rolled, and squared up the slab edges with a pizza cutter before baking. I also used two ¼” dowels and an extra-long rolling pin to help maintain an even thickness.

Bake as described above – don’t forget to cut out the individual pieces using your template and a sharp knife after 30 minutes of baking! After cutting, the pieces should be loosened and separated, and extra dough removed (for grateful snacking by same crew) before returning to the oven for additional 75 minutes of baking.
Let the cookies rest on the baking sheet for about 10 minutes before removing them to a wire rack to finish cooling. The resulting shapes will be very solid and hard, and fairly easy for the novice to work with. (Thinner pieces would probably look nicer, but in the end, the thicker ones were, I think, pretty forgiving.) All three of my children found the cookies to be irresistible, and the house smelled like Christmas!
Construction
Good news on the construction front: Icing covereth a multitude of sins.
Despite my best efforts to keep my pieces square, the resulting baked pieces weren’t. In the end, it really didn’t matter, though: Thickly-applied Royal Icing makes a superb “construction cement” and dries rock-hard. I was even able to successfully repair our Carpenter's Square cookie, which my excited 3 yo dropped on the table. The only real construction challenge in my particular design was getting the center piece, which turned out to be slightly too long, to fit: I chiseled a 1/2” wide channel in one end piece, and shaved the edge of the handle piece as well, using a serrated steak knife and the bottom handle of a metal toddler spoon, until I was satisfied with the fit.
Any Royal Icing recipe will probably do, but I had success using Wilton’s Meringue Powder (available anywhere cake decorating supplies are sold). Whip together the following at high speed, until stiff peaks form:
- 3T meringue powder
- 6T water
- 1 pound (4 cups) confectioner’s sugar.
I am a stickler for not letting my kids eat raw eggs. The risk probably isn't that great, but I don't like to worry about such things, and using the powder eliminates that concern.
I used brown food coloring gel to tint a small amount (less than a cup) of the icing. The resulting shade was more or less the color of peanut butter, but I thought it looked better than stark white, since we weren’t going for a winter scene here.
To assemble the tool box, I loaded about ½ cup at a time into a quart-size plastic bag, then snipped off one corner. I squeezed a thick bead of caulk --er, frosting along the edge about to be cemented, and after setting the piece, ran a finger along the bead to smooth out the joint. I attached the two long side pieces to the bottom piece first, and was impressed with how little support was needed to keep the pieces square – though I did set a thick book next to each side, just in case. I also gave these first two pieces about 15 minutes to set before adding next one short side, then the middle handle piece. The chiseling of the final side was the only adjusting needed, and the sturdy piece was then left to dry, unsupported, overnight.

The result is a very heavy, rustic-looking, not-ready-for-Food Network tool box. :)
After that, the only thing left to do is ….
Decorate!
There are no rules here, of course – you go to town with whatever appeals to you and your kids!
We experimented with trying to make a wood grain appearance on the outside of the box. I settled for a simple glaze:
- 1 cup confectioner’s sugar
- ¼ c milk – skim, to keep it from being too white, and to ensure it will dry completely
We glazed the entire box and let it dry; then I tinted more glaze with a whole lot of brown gel (as dark as I could get it) and painted lightly over the white glaze with a couple different kinds of brushes (sterilized 1/2” easel brush and a silicone pastry brush, mostly).
I had planned to let the kids decorate to their hearts’ content using leftover Easter candies; however, you can’t do much with marshmallow peeps. :) Anyway, once the "wood grain" dried, it looked so nice I thought adding more would be overkill. So, instead, we just opened up 8 Hershey Kisses, and used brown-tinted frosting to "glue" them on the long faces of the box as if they were screws. Ta-daah!
The rest of the Royal Icing was tinted in cheerful shades of red, yellow, green and a very pale blue, with some left white; this was used to paint the tool set.

When everything was dry, we put it all together to honor good St. Joseph. At my 5 yo son's insistence, we put out a toy set for young Jesus to play with alongside his Foster Daddy --because every little boy knows how important that is! (As he put the toys together, he was heard to say, "Oh, Baby Jesus will love this!") :)
St. Joseph the Worker, Pray for Us!
Pin It
That is amazing - what a clever, clever idea. Gingerbread is great for creating foods that need "shape."
ReplyDeleteWow Eileen!!! That is great!!! I love it!
ReplyDeleteWow, that is really great Eileen, great job!!!
ReplyDelete